Installing Drip Irrigation
Last summer was our first venture into installing drip irrigation. At the outset, it seemed like a challenge, but with nothing more than a few YouTube videos, I ordered our first set of supplies and set out to assemble them. I was motivated by my determination to be a weekend farmer while I continued on at my teaching job several hours away during the weekdays. I needed a system to deeply water our fast-draining sandy/loamy beds while I was away most weeks. For us, a drip irrigation system on timers worked well.
Now, I need a system that will properly manage the soil (mostly clay soil) on our new farm in the Adirondacks. Too little water and the clay will dry into a solid mass, locking up and destroying delicate roots. Too much water and plants will drown, since the clay drains poorly. Drip irrigation will serve our purposes again at the new place, with only minor changes to the set up.
To start, we ordered our drip irrigation supplies from Drip Depot. I recommend ordering a small farm kit for your first try at drip irrigation. It will come with all of the pieces you need and even a few that you don't really need, but that are nice to have. For me, the kit was an education in irrigation. I would have had no idea which parts to order otherwise. Now I understand each part's role and am confident in ordering individual parts as needed.
The main parts of an irrigation system are the mainline (relatively inexpensive larger tubing) and the drip tape (more expensive flat irrigation tape with water emitters spaced evenly along it). Then you need a part for controlling the pressure in the system, for connecting the mainline to the hose line, for linking the irrigation tape to the mainline, and for capping the end of the mainline. You also need a tool for puncturing the mainline. A kit will come with "goof plugs" for plugging mainline holes that are misplaced and end caps for irrigation tape (which you don't really need- there is an easy way to do this for free- see below). All of the above-mentioned parts and tools should come with your kit.
The juncture of the mainline (right) and a piece of drip tape (left). A hole must be punched in the mainline for the valve that connects the two.
Note: Our kit did not come with parts for connecting one drip tape to another (see image of coupler below). You'll want to order a few, because they will come in handy when you inadvertently puncture or cut through an otherwise good piece of tape. Just cut each piece square and reconnect them. You'll be good to go again. I wish I had known about those earlier. Last summer I tried patching two places where my pitch fork got away from me with waterproof tape from the home improvement store. That did not work, and I ended up pulling out the whole piece of tape for a replacement. Be sure to purchase the proper size for the diameter of your drip line.
Drip tape coupler for connecting 2 pieces of drip irrigation tape.
Our beds follow Floret Flower Farm's set up. They are each 4 feet wide and the there is a 1.5 foot aisle between them (for annuals). We make every other aisle 4 feet wide for the perennials so that we can spread compost around them from the cart on the mower without disturbing the plants. Each bed has 4 drip tapes running down it. We have 4 main fields/areas that we plant into. Each one is 85 feet long. When the end of the season comes we don't have to worry about the drip tape pieces getting mixed up. They are all the same length. We just label the mainlines with duct tape so we know where to set them back out in the spring. The irrigation tape will be rolled up on a reel and stored in the shed. (It can be drained and left out if you don't have plans to till or are comfortable moving it aside.)
Figuring out the amount of drip tape line you need is as easy as multiplying the length of the beds by 4, and then by the total number of beds. You need a mainline for each plot. Mainlines should be placed on the side of the plot that is nearest the water source and probably not downhill from the plot so as not to add stress to the system.
Choose your irrigation tape emitter spacing based on the type of soil you have. 8-inch spacing is appropriate for well-draining sandy soil (what we had at our last place in southern New Hampshire). 12-inch spacing is recommended for soils that have more clay.
To connect the irrigation tape to the mainline you'll first need to make holes in the mainline with a tool like this (see below). At first, I thought there was some kind of trick to it. It took me a while to figure it out. But, all you really do is press the metal end of the tool (looks like a ring) hard and twist it with pressure until you feel it pop through the surface of the mainline. It requires some elbow grease. There is a small button on the side of the tool that releases the plug of plastic if it is lodged in there. In hindsight, I wish I spent extra money outside of the kit to purchase one of the easier to use tools that function with a clamping/squeezing motion.
Mainline hole cutter
Insert a valve into the mainline (you'll feel it kind of pop in when the lip catches) and loosen (unscrew) the drip tape connector ring.
Put your piece of irrigation tape over the valve's exit and tighten the valve connector ring (screw it back on).
At the other end of your tape, fold over a few inches of the line. Insert the folded end into another small piece of cut off tape (a few inches works fine). The pressure of the kink will prevent the line from leaking. (And you won't have to use the drip tape end caps, which sometimes blow out anyways!)
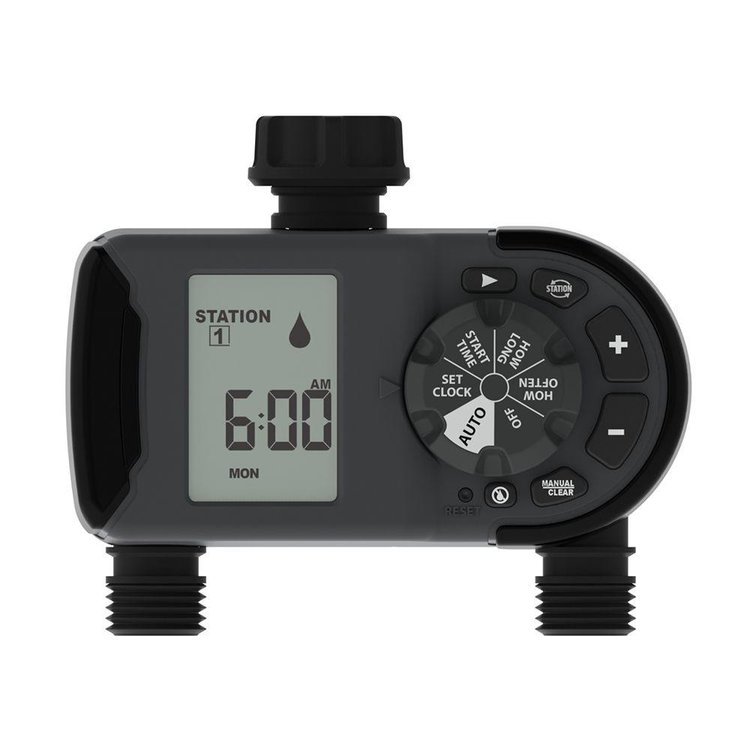
Last summer we used Orbit timers from the home improvement store. I purchased timers that had two outlets. I set one up to water our field for several hours several times a day. The other watered the landscaping and perennial beds on a different schedule. We had to replace one timer mid summer. I took it off to change hoses and it was sitting upside down. Some water spilled on it and worked its way inside. When used properly (right side up) we didn't have an problems with them.
Orbit 2-outlet watering timer.
I think I've fit the important notes into this post. If I left anything out or you have any questions, please let me know in the comments.
Best,
Looking for more?
We have lots more to share! Learn more about the Pro Platform- where we share weekly behind the scenes video tips about our favorite plants, efficient processes, and must-have tools. Members have access to the full library, plus downloads and templates, our vendor lists, special offers, and a tool gallery.


